Tests Management Section
 HOW TO CREATE AND REVIEW YOUR TESTS
This article explains how to configure your Test Groups, Test Series, and Tests from the configuration.
During the implementation phase, a complete set of Test Groups and related information is uploaded at once by the Optima team. See how to set your Test Master Data
Once these Tests Groups are in the system, you can access this master data from the Test Management Section.
You can edit existing entries and add new ones.
Only users with the appropriate permission should be able to add or modify them.
The order of the pages in the submenu of this section follows the logic of creating new Test Groups, Test Series, and Tests.
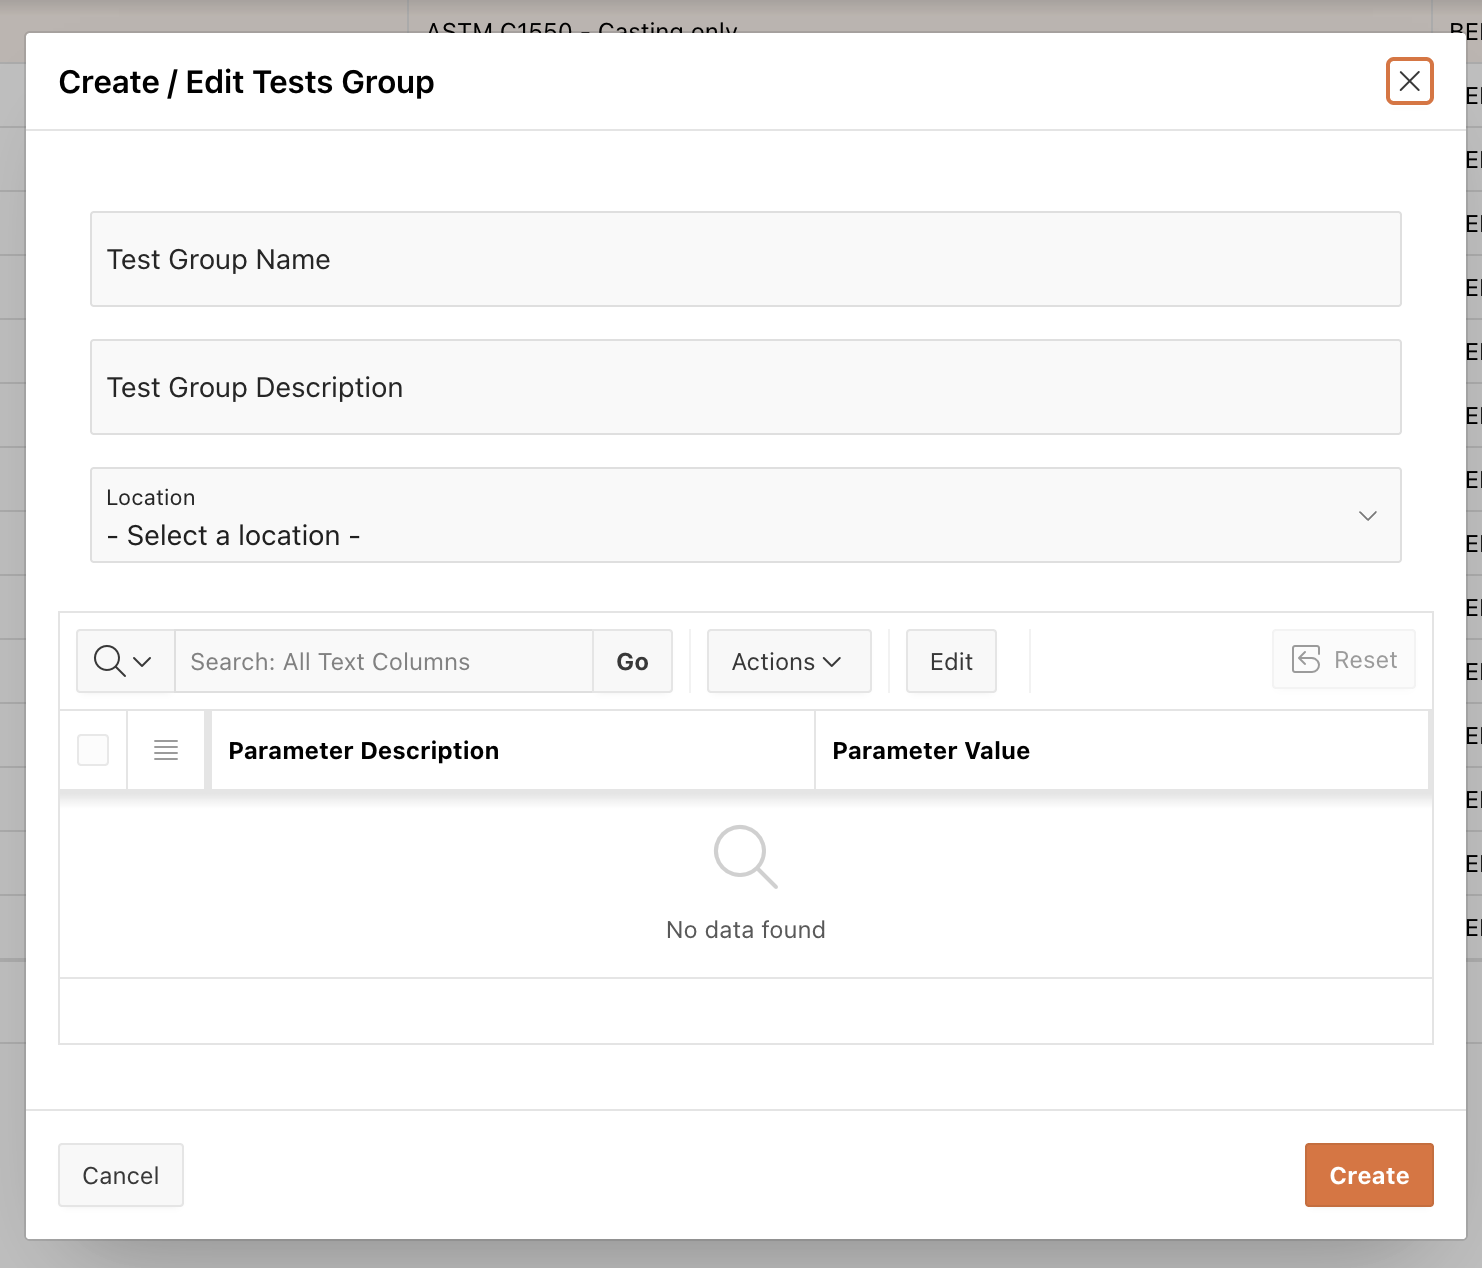
Create and Review your Tests Groups
This page allows you to create and review the different Tests Groups operating in the laboratory.
| Item | What / Used for |
Tests Group Name | It should be a unique name (max. 40 characters) |
Tests Group Description | This free text allows you to add further descriptive information (max. 40 characters) |
Location Code | Refers to the location where the Tests Groups should be performed. All related Test series and Tests should be allocated to same location. |
Parameters | The custom parameters defined at the Tests Group level can be found here. When no parameters have been set, the corresponding field is inactive. |
For creating a new Tests Group use the CREATE Button
For editing a Tests Group use the EDIT icon an every single row
Save by clicking on the CREATE Button
Create and Review your Tests Series
This page allows you to review or create the different Tests Series operating in the laboratory.
| Item | What / Used for |
Tests Series Name | It should be a unique name of a Test Series (max. 40 characters) It can have same name than a Tests Group. |
Tests Series Description | This free text allows to add further descriptive information (max. 40 characters) |
Location | Refers to the location where the Tests Series should be performed. All related Test series and Tests should be allocated to same location. |
| Same Instrument | Indicate if Y/N when same instrument group has been indicated in multiple Test steps Yes, if the same instrument is to be used for all Tests within a Tests Series No, if it is not necessary to book the same instrument for all Tests |
| Same Employee | Indicate if Y/N when same competency group has been indicated in multiple Test steps Yes, if the same employee is to be used for all Tests within a Tests Series No, if it is not necessary to book the same employee for all Tests |
Parameters | The custom parameters defined at the Tests Series level can be found here. When no parameters have been set, the corresponding field is inactive. |
For creating a new Tests Series use the CREATE Button
For editing a Tests Series use the EDIT icon an every single row
Save by clicking on the CREATE Button
Create and Review your Tests, Steps and Parameters
This page allows you to review or create your Tests and configure their corresponding Steps.
On the left-hand side of the screen, you can see the complete list of tests already created in the system.
Click on a Test Name to access all details related to that test.
The Test Master Data and its Steps are displayed on the right.
The Test Master Data and the Steps definition are two separate areas, each with its own Create button.
The Test Master Data must be entered first when creating a test, followed by its corresponding Steps, which must be sequential and can be as many as necessary.
MASTER DATA OF YOUR TEST
When clicking on the EDIT icon, the editing form is composed of the following fields.
When Clicking on the CREATE button, the form comes empty with the following fields.
| Item | What / Used for |
Location Code | Refers to the location where the Tests should be performed. All related Test Groups, Series and Tests should be allocated to same location. |
| Test Name | Should be unique. This free text allows the naming of the Test ( max. 40 Characters) |
| Test Description | This free text allows to add further information about your Test (max. 40 characters) |
| Test Comments | This free text field allows to add further explanation about your Test (max. 100 characters) |
| Same Instrument | Indicate if Y/N Yes, if the same instrument is to be used for all steps within the test No, if it is not necessary to book the same instrument for all steps within the test |
| Same Employee | Indicate if Y/N Yes, if the same employee is to be used for all steps within the test No, if it is not necessary to book the same employee for all steps within the test |
Parameters | The custom parameters defined at the Test level can be found here. When no parameters have been set, the corresponding field is inactive. |
DEFINITION OF YOUR TEST STEPS
When clicking on the EDIT icon, the editing form is composed of the following fields.
When Clicking on the (+) button, the form comes empty with the following fields.
| Item | What/ Used for |
| Location Code | Refers to the location where the Tests should be performed. All related Test Groups, Series and Tests should be allocated to same location. |
| Step order | Enter Number to ease the ordering of your Steps within a Test |
| Test Step Name | This free text allows the naming of the Step ( max. 40 Characters) |
| Test Step Description | This free text allows to add further information about your Step (max. 40 characters) |
| Step Duration ( Minutes) | Enter duration time in minutes |
| Calculation | Enter Y ( YES) /N ( NO) to multiply the duration of the step by number of samples |
| Delay ( Days) | Enter the delay for a step to start (days). The step will then begin after the specified number of days from the previous step. Note that the engine calculates using calendar days and takes into account site holidays and employee shifts. |
| Can be Split | Enter Move, Keep or Split - see definition below * |
| Percentage split | Enter a double digital number |
| Instrument Group 1 | Refers to the Instrument Group |
| Competency Group 1 | Refers to the Competency Groups |
| Instrument Group 2 | In case an additional instrument is required. the Instrument Group should be different that the in Group 1 |
| Competency Group 2 | In case a second person is required. the Competency Group should be different that the in Group 1 |
| Instruments Groups Logic | Enter and / or - see definition below * |
| Competency Groups Logic | Enter and / or - see definition below * |
Parameters | The custom parameters defined at the Step level can be found here. When no parameters have been set, the corresponding field is inactive. |
* Definition of the option for " can be split" and % of Split
This informs the engine how to proceed if no slot matching the defined duration of the step is available for the entire period within a one-day shift.
| Option | Definition |
| MOVE | If the engine finds an available slot that is shorter than the duration of the step, it should be searching for the next available slot with adequate duration for the step. |
| KEEP | This applies to an instrument expected to operate overnight (beyond a single day shift) or over several days. The corresponding step should preferably not have a competency group assigned, as the person assignment would also extend beyond their shift. |
SPLIT | If the engine finds an available slot that is shorter than the duration of the step, it can be split according to the percentage assigned to the first slot. |
% SPLIT | % value indicating the proportion of the first slot when split option has been selected |
* Definition of the Logic about Competency Group 2 / Instruments group 2
This option is used when a second Competency group and/or a second Instrument group has been specified and offers the possibility to indicate the logic for the two groups.
| Logic | Definition |
| YES | Means that the engine will pick up one person from each Competency group to collaborate in a specific step of a test. Or one instrument from each Instruments group. |
| NO | Means that the engine will select one person from one of the two Competency groups / one instrument from one of the two Instruments groups |
ORDER OF YOUR STEPS
The order of your steps can be rearranged by simply using the up & down arrows.
The steps within a test can only be sequential.
MATRIX: Build up and review your Tests Groups compositions
Once your Tests groups, Tests Series and Tests are created, this page allows you to build up the link between your Tests Groups & Tests Series, and your Tests Series & Tests.
MATRIX TESTS GROUPS & TESTS SERIES
This is the first matrix to start with in order to assign one or more Tests Series, in parallel or sequential mode to your Tests Group.
When clicking on the EDIT icon, the editing form is composed of the following fields.
When Clicking on the CREATE button, the form comes empty with the following fields.
ORDERING YOUR TESTS SERIES WITHIN A TESTS GROUP
Tests Series can be added in parallel or sequential mode within a Tests Groups, provided that the same Test Series is not selected simultaneously in parallel.
If you wish to reorder the Series, ensure that the numbers remain progressive.
You may need to edit the higher numbers first to avoid errors.
MATRIX TESTS SERIES & TESTS
Once your Tests Series is linked to a Tests Group, this one is displays in the bottom table from which you can edit or add additional Tests, in parallel or sequential mode to your Tests Series.
When clicking on the EDIT icon, the editing form is composed of the following fields.
When Clicking on the CREATE button, the form comes already by default with the selected Test Series in order to add the Test
ORDERING YOUR TESTS WITHIN A TESTS SERIES
Tests Series can be added in parallel or sequential mode within a Tests Groups, provided that the same Test Series is not selected simultaneously in parallel.
If you wish to reorder the Series, ensure that the numbers remain progressive.
You may need to edit the higher numbers first to avoid errors.
OVERVIEW OF THE TESTS MANAGEMENT
This page provides an overview of all your Tests Groups, their linked Tests Series, and the corresponding Tests and Steps.
This is a view- only page; no editing is possible here.
The table can be reorganised in various ways using the Actions menu.
Your preferred view can then be saved as a Report and downloaded.
Related Articles
Tests Master Data
HOW TO SET UP YOUR TESTS The Excel file #5 - Tests contains the information required to define all your tests to be scheduled by Optima. The Excel file #5 - Tests contains 6 worksheets to define the Tests Groups, Tests Series, Tests, Test Steps and ...Introduction to designing your Master Data
HOW TO CONFIGURE YOUR OPTIMA LRMS® There is a range of information that needs to be uploaded into your system so that the different types of tasks can be planned and executed correctly according to the skills of your employees, the technical ...Instruments Master Data
HOW TO SET UP YOUR INSTRUMENTS The Excel file #3 - Instruments Master Data contains the necessary information to categorise and define your instruments. See attached file The Excel file #3 - Instruments Master Data contains 5 worksheets to define ...Instrument Management Section
HOW TO SET-UP YOUR INSTRUMENTS in the INSTRUMENT MANAGEMENT SECTION This article describes the procedure on how to configure your instruments to be scheduled into Optima. 1. Define your Instrument Status This section lists the different statuses that ...Users Master Data
HOW TO SET UP YOUR OPTIMA´ USERS The Excel file #2 - USERS MASTER DATA contains the information required to define the categories of your users´ and assign them a full or limited licence. The Excel file #2 - USERS MASTER DATA contains 5 worksheets to ...